How to: Safely connect an HPS lamp and avoid common mistakes!
Connecting an HPS (High Pressure Sodium) lamp requires careful attention to safety and proper installation practices. Below is a step-by-step guide for safely connecting an HPS lighting system:
Supplies
- HPS lamp (suitable wattage for your ballast)
- HPS fixture or reflector with fitting (usually E40)
- Electronic or magnetic ballast suitable for HPS lamps
- Connection cables
- Timer (optional, for automatic operation)
- Gloves (for protection during installation)
Step-by-step Installation
-
Safety First:
- Make sure the power is turned off before starting installation to avoid electric shock.
- Wear gloves when handling the HPS lamp, as grease and dirt from your hands can affect the life of the lamp.
-
Mount the Reflector/Fixture:
- Mount the reflector or fixture in the desired location in your grow room.
- Make sure it is securely fastened and hanging in a stable position.
-
Install the HPS lamp:
- Screw the HPS lamp into the reflector socket. Make sure the lamp is securely fastened, but don't overtighten to prevent breakage.
- Do not touch the lamp's glass with bare hands. Use a cloth or wear gloves.
-
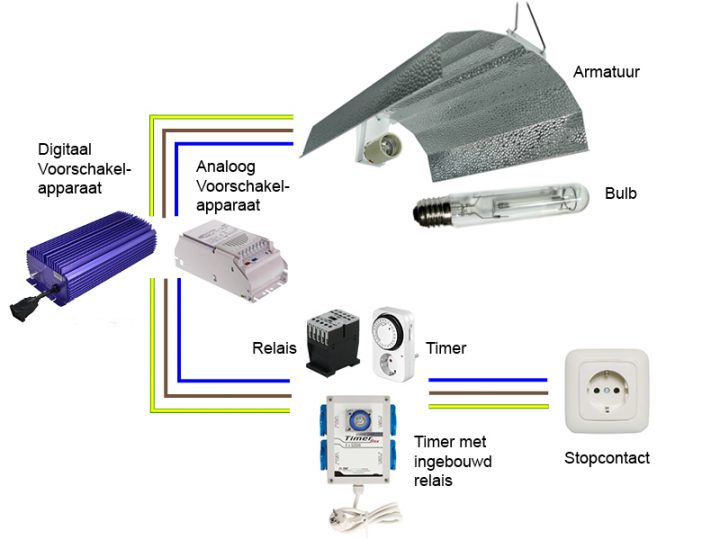
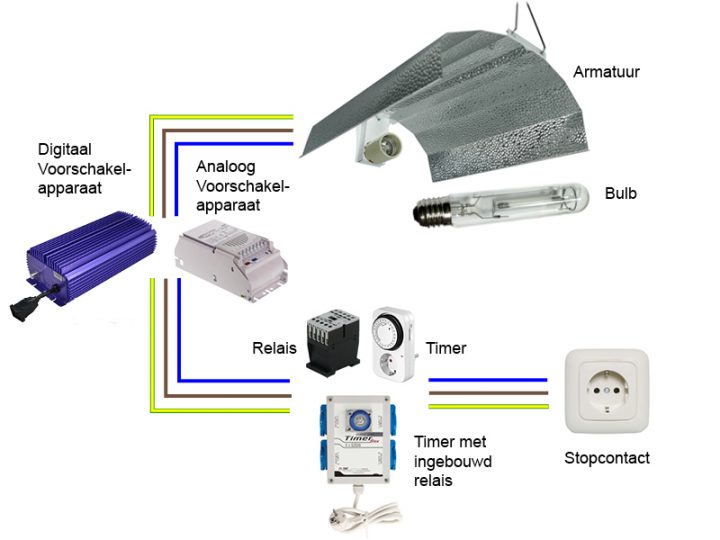
Connecting the Ballast:
-
Magnetic Ballast:
- Connect the lamp to the ballast using the corresponding terminals. The ballast usually has an input for the mains voltage (L, N, and ground) and an output for the lamp.
- Use appropriate connection cables and follow the wiring as per the diagram on the ballast.
-
Magnetic Ballast:
-
-
Electronic Ballast:
- Follow the manufacturer's instructions. Electronic ballasts often have marked connections for both the input (to the power cord) and the output (to the lamp).
- Connect the lamp's wires to the ballast, making sure all connections are secure and correct.
-
Electronic Ballast:
-
Connecting the Power Cord:
- Connect the ballast to the power cord. Make sure the wiring is correct and the connections are well insulated.
- Place the ballast in a safe position, away from direct moisture and heat.
-
Optional: Install Timer:
- Connect a timer between the ballast's power cord and the wall socket if you want the HPS lamp to automatically turn on and off according to a schedule.
- Set the timer to the desired light cycle (e.g. 18/6 for growth or 12/12 for flowering).
-
Turn on power:
- Turn the power back on and check if the lamp is working properly.
- Allow the lamp to warm up completely (this may take a few minutes) and check for stable operation.
-
Safety Check:
- Ensure that all cables are routed safely and that there is no exposed wiring.
- Check that the fixture and ballast are not generating excessive heat and that ventilation is good.
Connection diagram:

Color codes:
Common Mistakes to Avoid
- No Grounding: Make sure all components are properly grounded to avoid electric shock.
- Wrong Ballast: Always use a ballast that is compatible with the wattage and type of HPS lamp.
- Overheating: To prevent overheating, do not place the ballast in areas with inadequate ventilation.
- Incorrect Mains Voltage: Check that the mains voltage is compatible with the ballast specifications (usually 120V or 240V).
Safety measures
- Always turn off the power during installation and maintenance.
- Use good quality cables that are suitable for the wattage of the lamp.
- Ensure good ventilation in the grow room to prevent overheating of the lamp and ballast.
- Check the wiring regularly for wear or damage and replace if necessary.
Properly connecting an HPS fixture contributes to both the safety and efficiency of your growing environment. If in doubt or for specific situations, it's advisable to consult a professional.


